Would just like to share a little listen to my Bon Iver Flume cover on this very rainy day. Happy listening.
Bon Iver-Flume Cover

Wednesday, September 30, 2015
Saturday, September 26, 2015
Fall Decor
These fall decor ideas are cheap and easy but gives a feeling of warm fires and apply pie. These are just a few pictures of my fall decor but I want to add as I go on.


Fall


DIY Table
So this table like many projects has caused me to go crazy and feel defeated but you can't win them all. I like how the table turned out but it didn't go with my chairs and the color of the living room. I even ended up changing the color in the end but it didn't work out either. I took it from the garbage because I wanted a long table for Thanksgiving but I went back to my round table and now I continue to look for another. So here is my process in redoing this table.
These are the steps I followed:


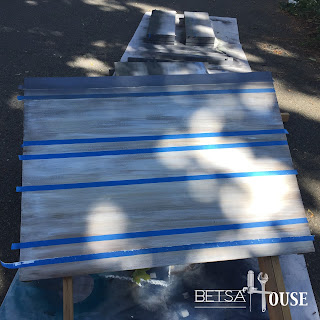


These are the steps I followed:
- Spray painted the edges and legs with a dark grey color.
- Taped off the edges and got some white primer paint.
- Took a cheap paint brush with a a thin bristles from the dollar store and painted a thin layer of the primer.
- Took a deep brown stain and painted over the primer and repeated the steps over again to create layers.
- Taped lines with blue painter's tape. I didn't measure just eyeballed it.
- Spray painted over the lines and created drops with the spray can trying my best to make it look like wood work.


After


Repainted


Saturday, September 19, 2015
Wooden Needle Point
This is my favorite and super easy DIY wall creation.
All you will need is these four things:


All you will need is these four things:
- Hammer
- String
- Pretty Nails (I chose gold ones but make sure the head of the nail has a ledge so the string doesn't fall off)
- A piece of wood (make sure it is nail-able)
- You can follow a stencil if it is a more difficult design but I like to free hand it.
- Nail in the shape of the design you want and for an even more secure hold dip the nail in super glue and then nail it in the wood.
- Take the string a tie it to the top nail and work your way around the nails (I really should do a video on the various ways you can string it around the nails)
- Make sure to tie the final loop tight and finish with a hook for the back.

After


Saturday, September 12, 2015
Random Small Projects
These are a few small projects that I quickly did and I don't have before pictures.
This chair was found in deep mold and was pretty grimy. I deep cleaned it and spray painted it and stained the inner wood and gave a deep brown wash over the spray paint.

This is a very simple DIY that I completely with a few wooden letters. I did an ombre color pattern and super glued some ribbon on the back to hold the letters together.

I did this piece one the wall with a couple of thumb tacks and string. I had no money to fill this space in so I made a simple arrow with string!

Saturday, September 5, 2015
Wooden Arrow DIY
So I wanted to create a wooden arrow for my living room but really couldn't afford what I was really envisioning. I wanted to make it out of metal but that I found would be trickier than expected. So I basically took a piece of wood I had already painted and added the tip and the feather to it.
Here are the steps I followed:


Here are the steps I followed:
- Bought a wide piece of wood from Lowes, on the thinner side so the weight of it wouldn't be too much to hang. Then I cut a triangle out of it.
- Then I bought two long pieces of wood for the tail of the arrow and cut it down into six pieces.
- I stained all of them and lastly glued them on and placed a hook on the back to hang it up.


After


Saturday, August 22, 2015
Night Stand Makeover
After a long summer of seeing family and going to the beach I finally got home and got back to my many projects. It was a beautiful summer full of laughs, love, and relaxing fellowship. So one of the projects I wanted to redo was my night stand that I took apart and ended up creating more storage.
Here is a picture of the before with my handy helper:

Here are the steps I followed:
- I spray painted the top and bottom a dark blue color.
- I used super cheap tape to make two thin white lines for arrows I was trying to create.
- I free handed the ends of the arrows with a brush and white paint.
- I painted the inside of the night stand white.
- The door that was on the night stand I converted into a shelf.
- Lastly I spray painted a clear finish to protect the piece.


After

Subscribe to:
Comments (Atom)